 Fueled by a desire to take better photos, last year I got myself a nice DSLR for Christmas. I’m certainly no photography expert�- but I did take the time learn a few photography tips I could immediately use to take substantially better photos. Some of these tips can be applied to any photo – not just using a DSLR – so even if you have a point and shoot or a camera on your smartphone, then it’s worth reading these.
I should stress, these are only for an absolute beginner; if you class yourself as an amateur photographer, you’ll probably laugh. For me, these tips pretty much blew my mind.
The Rule of Thirds
This really ought to be taught in school, and it’s so ridiculously easy to learn.�Essentially, photos will look better if your subject isn’t centered. I know, that may sound totally counter-intuitive, but hear me out.
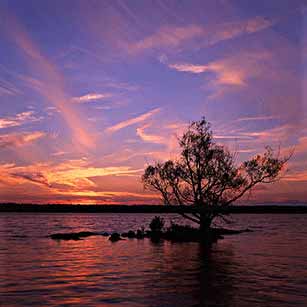
Every digital camera – even your iPhone – comes with a grid option, which overlays two vertical and two horizontal lines on the picture, splitting the image into 9 sections. Enable it now, and look around. Place items of visual interest onto these lines or at the intersections for a better composition. For example – if there’s a horizon in your shot, don’t place it dead in the center – align it along either the top third or bottom third line, depending on whether you want to place focus onto the sky or the ground/sea. If there’s a foreground subject – a person, or a tree – place them against either the left or right third lines.
This photo from Wikipedia (from user Moondigger) demonstrates the rule effectively.
On a related note:
leading lines�encourage a viewer to naturally move “through” your photograph, so including them can stimulate interest. Specifically, this might include a road, a river, or perhaps a short pathway leading out to your subject, or beyond.
Change your elevation or viewpoint
Logic dictates that you should take a photograph from eye-level right? Nope. Boring. Move the camera either up or down for a more interesting shot; obviously, this makes seeing the viewfinder somewhat more difficult, which is why a rotatable LCD screen can be a wonderful thing – you can hold the camera high above your head or on the ground, and still see what’s going on. This is especially important when photographing kids or animals.
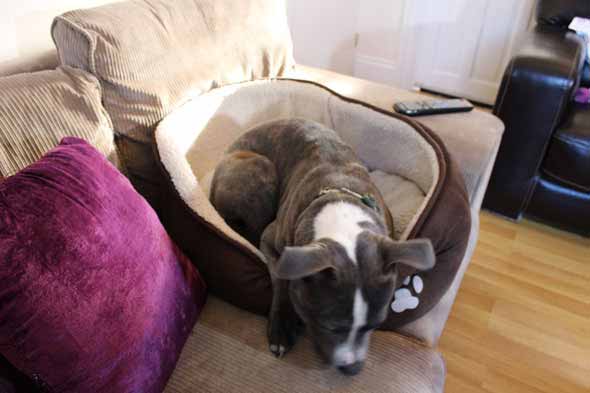
Here’s a random example to demonstrate the point; you love cute dogs right? Well here’s mine, and his name is Loki. The first is taken from eye level, and ignoring the rule of thirds. It is the very definition of a boring and bad photograph.
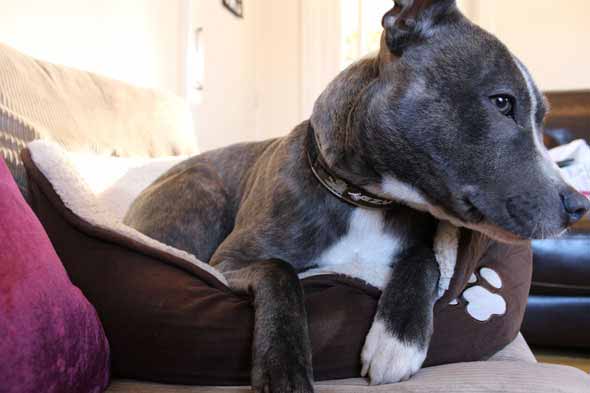
This one is taken from lower down, and attempting to use the rule of thirds for composition. All other settings remained the same. I think you’ll agree it’s much better.
Always take photos in full resolution and full quality
With memory cards so cheap nowadays, there’s absolutely no excuse for dropping the quality down on the camera side – if you need to optimize the image for sharing or sending over email, do this on the computer using any standard photo management app. Why take anything less than the best? The only excusable reason for doing this is to speed up the file saving process if you need to shoot continuously. For most of us, it’s simply a waste.
If your camera is capable of taking
RAW format – where all the data the camera sensor receives is saved, and not just the final product – use it. You can’t go back and fix a bad JPG, but you might be able to with RAW.
You can’t put a price on some shots. Oh, and even if you do take a bad photo,
don’t delete it!
The Trifecta of Exposure (ISO), Aperture and Shutter Speed
This is the most difficult part of photography for me, so I want to thank Jackson for all his helpful advice. I’ll only explain these points briefly; for a thorough explanation head on over to the fantastic ExposureGuide.com, which is where this helpful diagram is from. Print it out, and stick it on your wall!
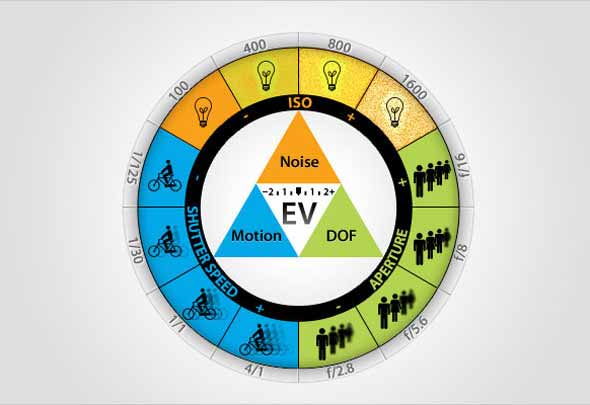
To explain briefly then, these three factors determine everything.
- ISO/Exposure is how sensitive the camera chip is to light; a high ISO will allow you to take photos even in very low light, but there’ll be more noise (“grainy”). Lower ISOs are better, but not always possible.
- Aperture determines the focal length and is the size of the physical opening to the lens. A higher number means there’s a smaller hole letting light in, which results in more of the background being sharp and�in focus. A smaller number is a larger opening, so background objects appear out of focus.
- Shutter Speed is how long the shutter remains open for, allowing more light in. Leaving it open for a longer time will show motion in a photo, while a short time will show a single moment.
Learn the modes on your camera
Even your most basic point and shoot will have at least:
- Manual�mode where you can specify everything.
- Automatic�mode where the camera will make a best guess.
- Programmed�mode where certain characteristics are pre-determind.
Generally speaking, you’ll want to stay away from programmed mode and anything to do with adding effects to the photo – these can always be controlled better with manual mode, or applied afterwards. If you take a photo in black and white on a compact camera, you’re simply destroying data that you can never get back again.
On a DSLR, you’ll find a few other modes, and it’s important you understand those too. These modes allow you to set a particular variable and let the camera work out the best values for the others.
- Av: Aperture Value. This is the most widely used mode for general shooting and gives you control over the Aperture. The camera will calculate the best shutter speed and exposure to use.
- Tv: Time Value. This gives you control over the shutter speed, allowing you to capture either motion or a single moment. The camera will calculate the best aperture and exposure values to use.
These two modes are where you’ll spend most of your time if you’re a beginner to DSLR photography, like myself.
Thanks for reading, and I hope these photography tips help you in some way.
MakeUseOf.com


 Fueled by a desire to take better photos, last year I got myself a nice DSLR for Christmas. I’m certainly no


![[Linked Image]](http://i201.photobucket.com/albums/aa3/elbertgreer/AAnd2more_tonemapped1000px_zps8435e3eb.jpg)


